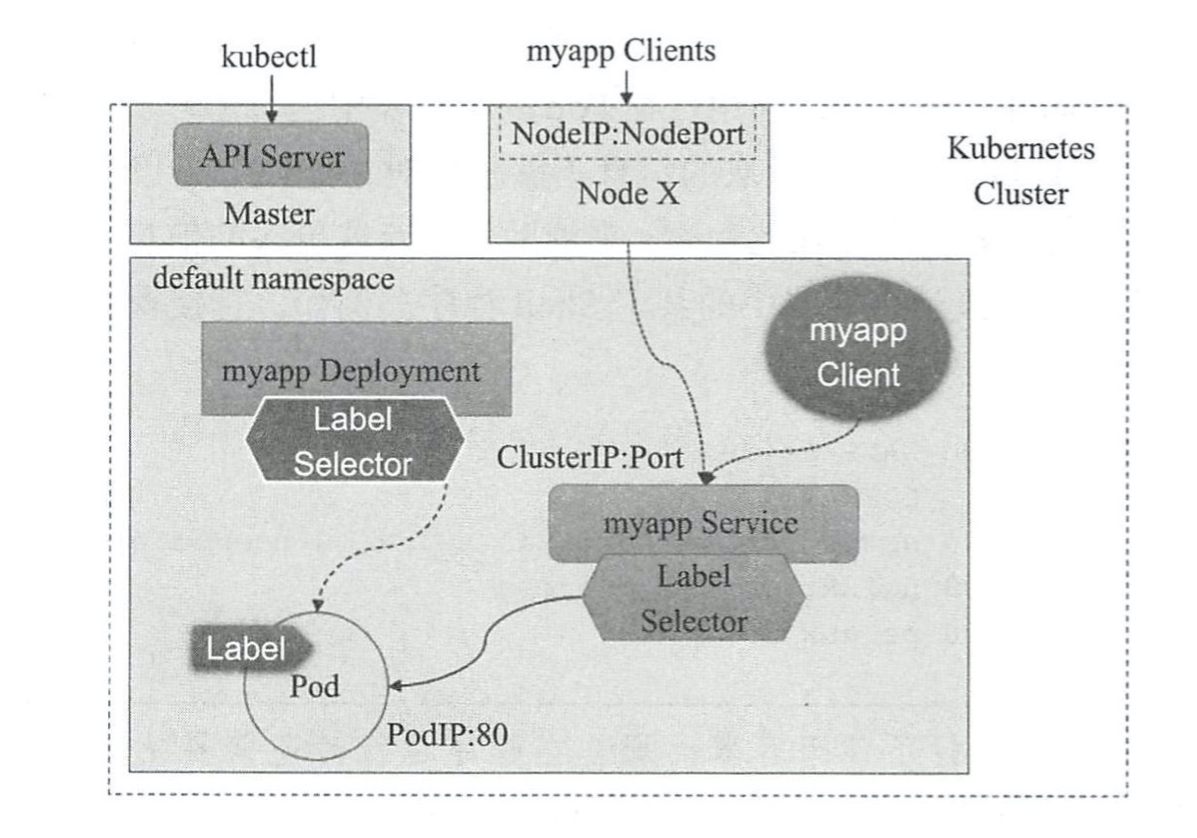
Service作为Pod的代理,将访问Service的请求转发给Pod,这里我们还需要再依赖与deployments控制器,然后将Service映射到deployments控制器上,才能对Pod进行代理转发(这一功能集于kube-proxy组件实现,kube-proxy组件一直监听apiserver的资源变动,特别是service资源变动,当kube-proxy监听到有关本机的变动,则对应生成iptables或则ipvs规则进行转发)
创建Service
创建service以下演示两种方式
|
1 2 3 4 5 6 7 8 9 10 11 12 13 14 |
#通过端口暴漏 ##kubectl expose:通过端口暴漏方式 ##deployment/nginx-deploy -n default:指定在控制器名称以及控制器所在的名称空间 ##--type:指定端口暴漏的方式,可选 [clusterip|nodeport|loadbalancer|externalname],四种为不同的暴漏方式(以后章节中会讲解,这里选择 clusterip 方式),表示为service生成一个集群IP ##--port:指定暴漏的端口 ##--name:定义service的名称 kubectl expose deployment/nginx-deploy -n default --type=ClusterIP --port=80 --name=nginx-svc #通过控制器映射 ##kubectl create service:创建一个service ##clusterip:采用clusterip方式,与暴漏端口方式的 --type 一致 ##nginx-deploy:指定service名称(此名称要与要代理的pod控制器一致) ##--tcp:指定映射的端口,第一个80为clusterip的端口,第二个80为pod要开放的端口 kubectl create service clusterip nginx-deploy --tcp=80:80 |
查看创建的Service
如下可以看到我们创建的两个service,并且都采用clusterip方式,各自分配了一个service集群IP
|
1 2 3 4 |
kubectl get service -n default -o wide NAME TYPE CLUSTER-IP EXTERNAL-IP PORT(S) AGE SELECTOR nginx-deploy ClusterIP 10.105.98.155 <none> 80/TCP 66s app=nginx-deploy nginx-svc ClusterIP 10.96.62.172 <none> 80/TCP 15m app=nginx-deploy |
查看Service的详细信息
|
1 2 3 4 5 6 7 8 9 10 11 12 13 14 15 16 17 18 19 20 21 22 23 24 25 26 |
kubectl describe service -n default Name: nginx-deploy #service名称 Namespace: default #service所属的名称空间 Labels: app=nginx-deploy #service的标签 Annotations: <none> #service的注解 Selector: app=nginx-deploy #当前Service对象使用的标签选择器,用于选择关联的Pod对象 Type: ClusterIP #即Servic巳的类型,其值可以是ClusterIP、NodePort和LoadBalancer等其中之一 IP: 10.105.98.155 #当前Service对象的ClusterIP Port: 80-80 80/TCP #暴露的端口,即当前Service用于接收并响应请求的端口 TargetPort: 80/TCP #容器中的用于暴露的目标端口,由Service Port路由请求至此端口 Endpoints: 10.244.3.11:80 #后端端点,即被当前Service的Selector调中的所有Pod的IP及其端口,代理的pod,(如果控制器有多个pod,这里将有多个pod的地址) Session Affinity: None #是否启用会话粘性 Events: <none> #外部流量的调度策略 Name: nginx-svc Namespace: default Labels: app=nginx-deploy Annotations: <none> Selector: app=nginx-deploy Type: ClusterIP IP: 10.96.62.172 Port: <unset> 80/TCP TargetPort: 80/TCP Endpoints: 10.244.3.11:80 Session Affinity: None Events: <none> |
通过service的clusterip访问至代理的pod
|
1 2 3 4 5 6 7 8 9 10 11 12 13 14 15 16 17 18 19 20 21 22 23 |
#通过nginx-deploy service的集群ip访问 k8sops@k8s-master01:~$ curl http://10.105.98.155 -I HTTP/1.1 200 OK Server: nginx/1.14.2 Date: Wed, 06 May 2020 08:42:51 GMT Content-Type: text/html Content-Length: 612 Last-Modified: Wed, 10 Apr 2019 01:08:42 GMT Connection: keep-alive ETag: "5cad421a-264" Accept-Ranges: bytes #通过nginx-svc service的集群ip访问 k8sops@k8s-master01:~$ curl http://10.96.62.172 -I HTTP/1.1 200 OK Server: nginx/1.14.2 Date: Wed, 06 May 2020 08:42:59 GMT Content-Type: text/html Content-Length: 612 Last-Modified: Wed, 10 Apr 2019 01:08:42 GMT Connection: keep-alive ETag: "5cad421a-264" Accept-Ranges: bytes |
通过域名访问Service
假如我们的Service IP发生了变化,或者Service发生了Down机,更或则Service也需要多台进行负载呢?这个时候就需要使用域名来访问到Pod,域名不会发生改变。
用域名访问Service需要添加CoreDNS将本机可以解析到Service层面,因为本机并没有使用k8s的网络插件进行配置,我们在pod中可以直接使用域名进行访问service,而在集群的宿主机中则需要添加CoreDNS来进行解析。
在Pod中直接访问Service域名进行调度
|
1 2 3 4 5 6 7 8 9 10 11 12 13 14 15 16 17 |
#Setp1 :进入容器 kubectl exec pods/nginx-deploy-788b9c6b69-tfcrx -n default -it -- /bin/sh #Setp2 :通过域名访问nginx-svc和nginx-deploy service; nginx-svc和nginx-deploy为service wget -O - -q http://nginx-svc.default wget -O - -q http://nginx-deploy.default #Setp3 :以上域名为简写,全写应为以下 wget -O - -q http://nginx-svc.default.svc.cluster.local wget -O - -q http://nginx-deploy.default.svc.cluster.local #default为名称空间,我们创建service的时候也没有指定名称空间,所以默认也是在default下, #svc为固定后缀,意思为服务 #cluster.local 为当前kubernetes集群所在域的域名,在我们初始化k8s时可以指定--service-dns-domain= 参数来进行绑定,如果没有指定则为 cluster.local #Setp4 :查看当前容器的dns配置文件,可以看到如下dns为CoreDNS的地址,搜索域为cluster.local,这也是在容器中可以简写就能访问到service的原因 cat /etc/resolv.conf nameserver 10.96.0.10 search default.svc.cluster.local svc.cluster.local cluster.local options ndots:5 |
在宿主机中添加CoreDNS进行访问Service域名进行调度
|
1 2 3 4 5 6 7 8 |
#查看CoreDNS服务器地址,CoreDNS的Service在kube-system名称空间中 kubectl describe service/kube-dns -n kube-system #将CoreDNS地址添加到/etc/resolv.conf中 echo 'nameserver 10.96.0.10' >> /etc/resolv.conf #在宿主机访问service的域名,因为我们没有在宿主机中添加搜索域,所以只能对全写域名进行访问 curl http://nginx-svc.default.svc.cluster.local curl http://nginx-deploy.default.svc.cluster.local |
删除Service和重建
删除service之后将无法通过serviceip进行访问,删除service不影响Pod的运行
|
1 2 3 4 5 6 7 8 9 10 11 12 13 14 15 16 17 18 19 20 21 22 23 24 25 26 27 28 29 30 31 32 33 34 35 36 |
#Setp1 :删除nginx-deploy和nginx-svc两个service kubectl delete service/nginx-deploy service/nginx-svc -n default #Setp2 :这个时候我们无法通过service的集群IP及域名访问到Pod #Setp3 :重建service,通过上面同样的方法创建出service kubectl expose deployment/nginx-deploy -n default --type=ClusterIP --port=80 --name=nginx-svc kubectl create service clusterip nginx-deploy --tcp=80:80 #Setp4 :查看创建的service,这个时候service的IP信息已经发生改变 kubectl describe service -n default Name: nginx-deploy Namespace: default Labels: app=nginx-deploy Annotations: <none> Selector: app=nginx-deploy Type: ClusterIP IP: 10.96.231.27 Port: 80-80 80/TCP TargetPort: 80/TCP Endpoints: 10.244.3.11:80 Session Affinity: None Events: <none> Name: nginx-svc Namespace: default Labels: app=nginx-deploy Annotations: <none> Selector: app=nginx-deploy Type: ClusterIP IP: 10.106.189.68 Port: <unset> 80/TCP TargetPort: 80/TCP Endpoints: 10.244.3.11:80 Session Affinity: None Events: <none> #Setp5 :通过Service域名再次访问Pod服务(这时通过域名访问service还是正常) curl http://nginx-svc.default.svc.cluster.local curl http://nginx-deploy.default.svc.cluster.local |
Service nodeport 端口映射
通过这种方法不仅可以实现通过域名访问,还可以集群内的任何一台机器的映射端口
|
1 2 3 4 5 6 7 8 9 10 11 12 13 14 15 16 17 18 19 20 21 22 23 24 25 26 27 28 29 30 31 32 33 34 35 36 37 38 39 40 41 42 43 44 45 46 47 48 49 50 |
#创建nodeport方式的端口映射 kubectl expose deployment/nginx-deploy -n default --type=NodePort --port=80 --name=nginx-svc-port kubectl delete service/nginx-deploy -n default kubectl create service nodeport nginx-deploy --tcp=80:80 #查看创建的nodeport端口映射的service kubectl describe service/nginx-svc-port -n default Name: nginx-svc-port Namespace: default Labels: app=nginx-deploy Annotations: <none> Selector: app=nginx-deploy Type: NodePort IP: 10.111.40.24 Port: <unset> 80/TCP TargetPort: 80/TCP NodePort: <unset> 31339/TCP #nginx-svc-port service将端口映射到了宿主机的31339端口,我们访问宿主机的31339端口首先会代理到service的80端口,然后service的80端口代理到pod的80端口 Endpoints: 10.244.3.11:80 Session Affinity: None External Traffic Policy: Cluster Events: <none> kubectl describe service/nginx-deploy -n default Name: nginx-deploy Namespace: default Labels: app=nginx-deploy Annotations: <none> Selector: app=nginx-deploy Type: NodePort IP: 10.100.66.121 Port: 80-80 80/TCP TargetPort: 80/TCP NodePort: 80-80 30390/TCP #nginx-deploy service将端口映射到了宿主机的30390端口,我们访问宿主机的30390端口首先会代理到service的80端口,然后service的80端口代理到pod的80端口 Endpoints: 10.244.3.11:80 Session Affinity: None External Traffic Policy: Cluster Events: <none> #通过集群内的任何一台机器的31339端口将会被代理到nginx-svc-port service上 curl http://192.168.31.221:31339 -I curl http://192.168.31.222:31339 -I curl http://192.168.31.223:31339 -I curl http://192.168.31.231:31339 -I curl http://192.168.31.232:31339 -I curl http://192.168.31.233:31339 -I #通过集群内的任何一台机器的30390端口将会被代理到nginx-deploy service上 curl http://192.168.31.221:30390 -I curl http://192.168.31.222:30390 -I curl http://192.168.31.223:30390 -I curl http://192.168.31.231:30390 -I curl http://192.168.31.232:30390 -I curl http://192.168.31.233:30390 -I |
每创建一个service都会在对应的Node上创建对应的iptables规则
以上配置完成后,整个访问浏览应该如下图所示