
官方文档:https://kubernetes.io/docs/concepts/scheduling-eviction/taint-and-toleration/#example-use-cases
污点(taint)是定义在Node之上的键值型的数据,用于让节点拒绝将Pod调度运行于其上,除非该Pod对象具有接纳Node污点的容忍度。而容忍度(tolerations)是定义在Pod对象的键值型属性数据,用于·配置其可容忍的Node污点,而且调度器仅能将Pod对象调度至其能够容忍该Node污点的Node之上。
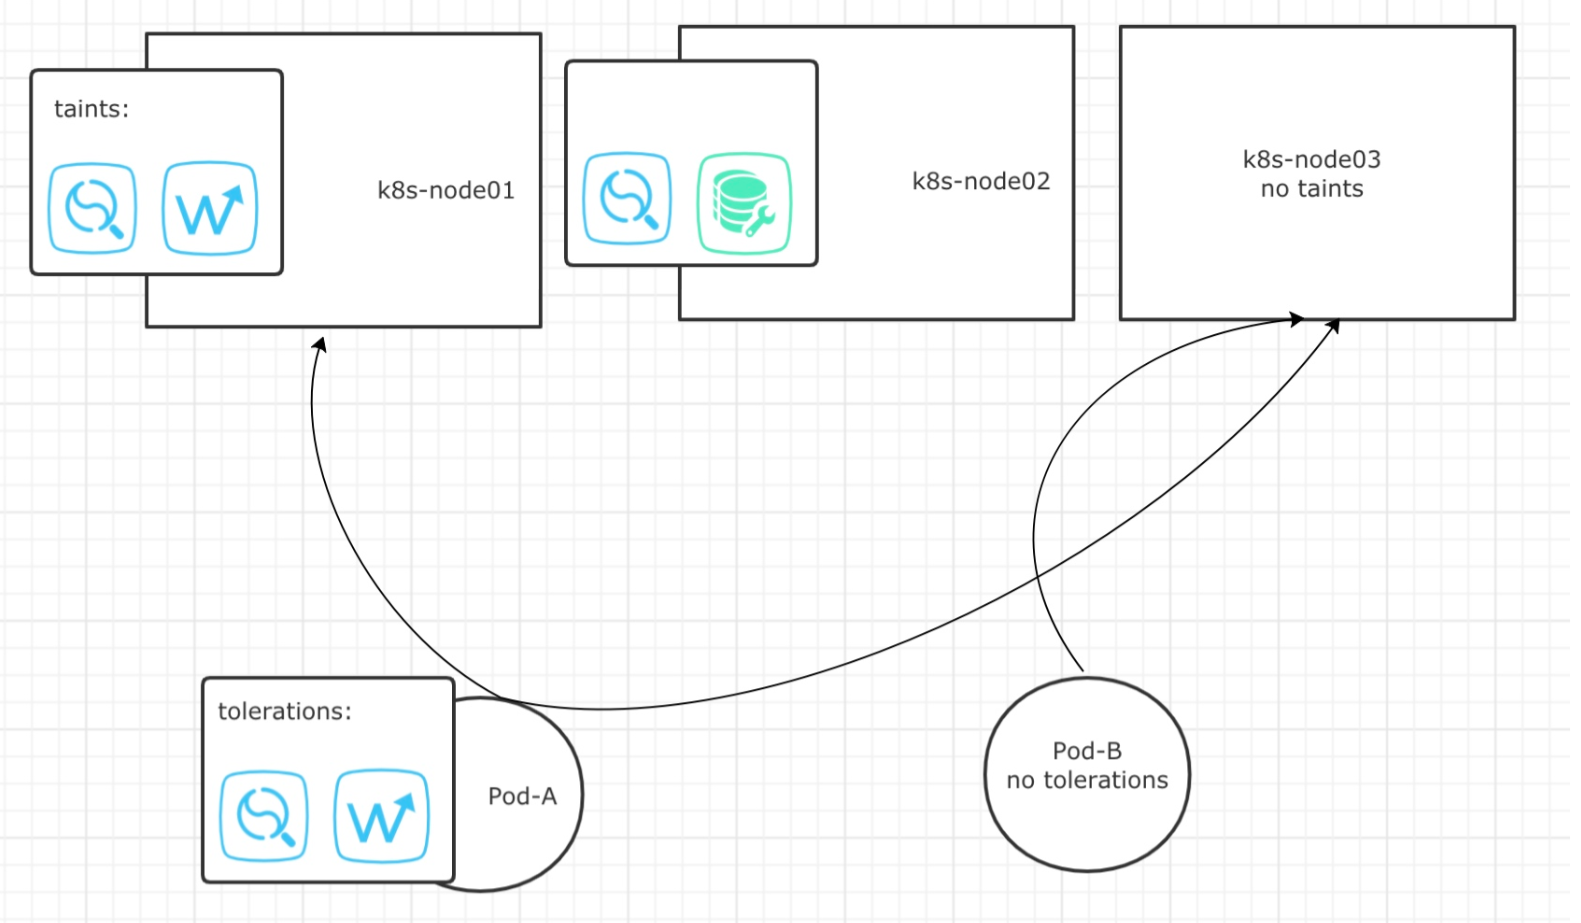
如下图所示:
Pod-A具备k8s-node01污点的容忍度,所以能够被调度器调度至k8s-node01上。
Pod-A不完全具备k8s-node02污点的容忍度,所以不能被调度至k8s-node02。
Pod-A虽然具备容忍度,但同样可以调度至没有污点的k8s-node03节点上。
Pod-B自身没有容忍度,所以只能被调度至没有污点的k8s-node03节点上。
污点介绍及定义
1.污点类型介绍
污点定义在nodeSpec中,容忍度定义在PodSpec中,他们都是键值型数据,但又都额外支持一个效果(effect)标记,语法格式为 “key=value:effect” ,其中key和value的用法及格式与资源注解信息相似,而effect则用于定义对Pod对象的排斥等级,它主要包含以下三种排斥类型。
- NoSchedule :为Node添加污点等级为NoSchedule,除容忍此污点的Pod以外的其它Pod将不在被调度到本机。
- PreferNoSchedule:为Node添加污点等级为PreferNoSchedule,不能容忍此污点的Pod对象尽量不要调度到当前节点,如果没有其它节点可以供Pod选择时,也会接受没有容忍此污点的Pod对象。
- NoExecute:为Node添加污点等级为NoExecute,能容忍此污点的Pod将被调度到此节点,而且节点上现存的Pod对象因节点使用了NoExceute等级的污点,则现存的Pod将被驱赶至其它满足条件的Node(除非现存Pod容忍了当前节点的污点)。
2.Master污点介绍
以kubeadm部署的kubernetes集群,其Master节点将自动添加污点信息以阻止不能容忍此污点的Pod对象调度至此节点,因此用户可以手动创建Pod来容忍Master的污点。
查看kubernetes集群中master节点的污点:
|
1 2 3 4 |
kubectl describe nodes/k8s-master01 nodes/k8s-master02 nodes/k8s-master03| grep Taints Taints: node-role.kubernetes.io/master:NoSchedule Taints: node-role.kubernetes.io/master:NoSchedule Taints: node-role.kubernetes.io/master:NoSchedule |
不过,有些系统级别应用,如kube-proxy或者kube-flannel等也是以Pod形式运行在集群上,这些资源在创建时就添加上了相应的容忍度以确保他们被 DaemonSet 控制器创建时能够调度至 Master 节点运行一个实例。
查看系统级别Pod的容忍度
|
1 2 3 4 5 |
kubectl describe pods/etcd-k8s-master01 pods/etcd-k8s-master01 pods/kube-flannel-ds-amd64-2smzp pods/kube-flannel-ds-amd64-2smzp -n kube-system | grep Tolerations Tolerations: :NoExecute Tolerations: :NoExecute Tolerations: :NoSchedule Tolerations: :NoSchedule |
另外,这类Pod是构成Kubernetes系统的基础且关键的组件,它们甚至还定义了更大的容忍度,从下面某kube-flannel实例的容忍度定义来看,它还能容忍那些报告了磁盘压力或内存压力的节点,以及未就绪的节点和不可达的节点,以确保它们能在任何状态下正常调度至集群节点上运行。
|
1 2 3 4 5 6 7 8 9 10 |
kubectl describe pods kube-flannel-ds-amd64-2smzp -n kube-system Tolerations: :NoSchedule node.kubernetes.io/disk-pressure:NoSchedule node.kubernetes.io/memory-pressure:NoSchedule node.kubernetes.io/network-unavailable:NoSchedule node.kubernetes.io/not-ready:NoExecute node.kubernetes.io/pid-pressure:NoSchedule node.kubernetes.io/unreachable:NoExecute node.kubernetes.io/unschedulable:NoSchedule Events: <none> |
3.定义污点
定义污点语法
kubectl taint nodes <node-name> <key>=<value>:<effect>
node-name:指定需要打污点的Node主机名
key=value:指定污点的键值型数据
effect:为污点的等级
key名称长度上线为253个自负,可以使用字母或者数字开头,支持字母、数字、连接符、点号、下划线做为key或者value。
value最长是 63个字符。
污点通常用于描述具体的部署规划,它们的键名形式如 node-type、node-role、node-project、node-geo等。
1.添加污点
为k8s-node02添加污点,污点程度为NoSchedule,type=calculate为标签
kubectl taint node k8s-node02 type=calculate:NoSchedule
2.查看污点
kubectl describe nodes k8s-node02 | grep Taints
这样的话我们创建Pod就不会被调度到我们打上污点的k8s-node02的节点上
3.创建Pod资源配置清单
我们创建3个Pod,看看其是否会将Pod调度到我们打污点Node上
|
1 2 3 4 5 6 7 8 9 10 11 12 13 14 15 16 17 18 19 |
cat taint-pod.yaml apiVersion: apps/v1 kind: Deployment metadata: name: taint-deploy spec: replicas: 3 selector: matchLabels: app: taint-pod template: metadata: labels: app: taint-pod spec: containers: - image: busybox:latest name: taint-pod command: [ "/bin/sh", "-c", "tail -f /etc/passwd" ] |
4.查看Pod被调度的Node
下面三个Pod都被调度到了Node03上,效果可能不是很明显,我们为Node02打了污点,还有Node01没有体现出来
|
1 2 3 4 5 |
kubectl apply -f taint-pod.yaml kubectl get pods -o wide | grep taint taint-deploy-748989f6d4-f7rbq 1/1 Running 0 41s 10.244.5.62 k8s-node03 <none> <none> taint-deploy-748989f6d4-nzwjg 1/1 Running 0 41s 10.244.5.61 k8s-node03 <none> <none> taint-deploy-748989f6d4-vzzdx 1/1 Running 0 41s 10.244.5.60 k8s-node03 <none> <none> |
5.扩容Pod
我们将Pod扩容至9台,让Pod分配到Node01节点,可以直观的展现污点
|
1 2 3 4 5 6 7 8 9 10 11 |
kubectl scale --replicas=9 deploy/taint-deploy -n default kubectl get pods -o wide | grep taint taint-deploy-748989f6d4-4ls9d 1/1 Running 0 54s 10.244.5.65 k8s-node03 <none> <none> taint-deploy-748989f6d4-794lh 1/1 Running 0 68s 10.244.5.63 k8s-node03 <none> <none> taint-deploy-748989f6d4-bwh5p 1/1 Running 0 54s 10.244.5.66 k8s-node03 <none> <none> taint-deploy-748989f6d4-ctknr 1/1 Running 0 68s 10.244.5.64 k8s-node03 <none> <none> taint-deploy-748989f6d4-f7rbq 1/1 Running 0 2m27s 10.244.5.62 k8s-node03 <none> <none> taint-deploy-748989f6d4-hf9sf 1/1 Running 0 68s 10.244.3.51 k8s-node01 <none> <none> taint-deploy-748989f6d4-nzwjg 1/1 Running 0 2m27s 10.244.5.61 k8s-node03 <none> <none> taint-deploy-748989f6d4-prg2f 1/1 Running 0 54s 10.244.3.52 k8s-node01 <none> <none> taint-deploy-748989f6d4-vzzdx 1/1 Running 0 2m27s 10.244.5.60 k8s-node03 <none> <none> |
以上调度了两台Pod到Node02,目前Node03和Node01都可以分配到Pod,而被打了污点的Node02无法分配Pod
6.删除污点
删除污点之需要指定标签的 key 及污点程度
kubectl taint node k8s-node02 type:NoSchedule-
容忍度介绍及定义
Pod对象的容忍度可以通过其spec.tolerations字段进行添加,根据使用的操作符不同,主要有两种可用的形式:
- 1.容忍度与污点信息完全匹配的等值关系,使用
Equal操作符。 - 2.判断污点是否存在的匹配方式,使用
Exists操作富。
容忍度所用到的参数tolerations,tolerations参数下的还有以下几个二级参数:
- operator:此值被称为运算符,值可以为[Equal|Exists],Equal表示污点的key是否等于value(默认参数),Exists只判断污点的key是否存在,使用该参数时,不需要定义value。
- effect:指定匹配的污点程度,为空表示匹配所有等级的污点,值可以为 [NoSchedule|PreferNoSchedule|NoExecut]。
- key:指定Node上污点的键key。
- value:指定Node上污点的值value。
- tolerationSeconds:用于定于延迟驱赶当前Pod对象的时长,如果设置为0或者负值系统将立即驱赶当前Pod。(单位为秒)
1.为Node打上不同的等级污点
|
1 2 3 |
kubectl taint nodes k8s-node01 nodes=gpu:NoSchedule kubectl taint nodes k8s-node02 data=ssd:PreferNoSchedule kubectl taint nodes k8s-node03 traffic=proxy:NoExecute |
2.查看三个Node被打上的污点
|
1 2 3 4 |
kubectl describe nodes k8s-node01 k8s-node02 k8s-node03 | grep Taint Taints: nodes=gpu:NoSchedule Taints: data=ssd:PreferNoSchedule Taints: traffic=proxy:NoExecute |
3.创建容忍NoSchedule级别污点的Pod并查看Pod调度结果
|
1 2 3 4 5 6 7 8 9 10 11 12 13 14 15 16 17 18 |
cat pod-tolerations.yaml apiVersion: v1 kind: Pod metadata: name: pod-noschedule spec: containers: - name: gpu-container image: busybox:latest command: [ "/bin/sh", "-c", "tail -f /etc/passwd" ] tolerations: - key: "nodes" #指定污点的key operator: "Equal" #Equal值表示我们指定的key必须要等于value value: "gpu" #指定value effect: "NoSchedule" #指定污点级别 #调度结果如我们期望所致在node01上 kubectl get pods -o wide | grep pod-noschedule pod-noschedule 1/1 Running 0 58s 10.244.3.62 k8s-node01 <none> <none> |
4.创建容忍PreferNoSchedule级别污点的Pod并查看Pod调度结果
|
1 2 3 4 5 6 7 8 9 10 11 12 13 14 15 16 17 |
cat pod-tolerations.yaml apiVersion: v1 kind: Pod metadata: name: pod-prefernoschedule spec: containers: - name: ssd-container image: busybox:latest command: [ "/bin/sh", "-c", "tail -f /etc/passwd" ] tolerations: - key: "data" operator: "Exists" #Exists参数,只判断key等于data是否存在,不需要关心value是什么 effect: "PreferNoSchedule #调度结果如我们期望所致在node02上 kubectl get pods -o wide | grep pod-prefer pod-prefernoschedule 1/1 Running 0 45s 10.244.2.82 k8s-node02 <none> <none> |
5.创建容忍NoExecute级别污点的Pod并查看调度结果
|
1 2 3 4 5 6 7 8 9 10 11 12 13 14 15 16 17 18 |
apiVersion: v1 kind: Pod metadata: name: pod-noexecute spec: containers: - name: proxy-container image: busybox:latest command: [ "/bin/sh", "-c", "tail -f /etc/passwd" ] tolerations: - key: "traffic" operator: "Equal" value: "proxy" effect: "NoExecute" #指定污点级别 tolerationSeconds: 300 #指定驱赶当前Node上Pod的延迟时间 #调度结果在Node03上 kubectl get pods -o wide | grep pod-noexecute pod-noexecute 1/1 Running 0 24s 10.244.5.89 k8s-node03 <none> <none> |
6.创建没有容忍度的Pod并查看调度结果
PreferNoSchedule污点级别为尽量不接受没有容忍此污点的Pod,如果没有其它节点可以供Pod选择时,也会接受没有容忍此污点的Pod对象。所以创建一个没有容忍度的Pod看其调度结果。
|
1 2 3 4 5 6 7 8 9 10 11 12 13 14 |
cat pod-tolerations.yaml apiVersion: v1 kind: Pod metadata: name: pod-notolerations spec: containers: - name: notolerations-container image: busybox:latest command: [ "/bin/sh", "-c", "tail -f /etc/passwd" ] #如下,调度结果与我们料想一致 kubectl get pods -o wide | grep pod-notolerations pod-notolerations 1/1 Running 0 29s 10.244.2.83 k8s-node02 <none> <none> |
实践中,若集群中的一组机器专用于为运行非生产典型的容器应用而备置,而且它们可能随时按需上下线,那么就应该为其添加污点信息,以确保仅那些能够容忍此污点的非生产型Pod对象可以调度到其上,另外,某些有种特殊硬件的节点需要专用于运行一类有着SSD、或者GPU的设备,也应该为其添加污点信息以排除其它Pod对象。